Prime all exposed wood with either acrylic or alkyd primer. Use alkyd primer over old oil-based paint or if the wood is very soft and punky. Allow the primer to dry as directed on the label
Paint the windows with two coats of acrylic latex paint. Paint from the inside out: first, the window sash, then the frames and finally the Read more: How to Paint Exterior Windows eHow.com http://www.ehow.com/how_5656807_paint-exterior-windows.html#ixzz0sLjNvSGM
Prime all raw or repaired areas with an oil base primer. If the window was previously painted with an oil base finish and you will be applying a modern acrylic paint, prime the entire window sash and frame.
A quick drying oil base primer is a good choice in most instances. Allow the primer to fully dry before proceeding with applying caulk or glazing putty.
Wednesday, June 30, 2010
Tuesday, April 13, 2010
Leaky Nibco frostproof sillcock
In order to fix this leaking around the handle,
you first remove the screw that holds the handle
on to the valve stem. Next, you remove the
packing nut - a large adjustable wrench will work.
Then you need to remove the old packing gasket
material and the brass packing washer.
Clean up the brass packing washer and replace the
packing washer, if you can find one in the size
you need. Look for a flat packing washer in your
hardware store. You can also check with a plumbing
supply jobber. It doesn't have to be the grey
clay-like material that you removed. I searched
many stores without success. I fashioned a new
packing washer out of 1/8" thick rubber, and it
worked fine. Make sure you put some thread dope
on the packing nut threads before you re-install
it. Don't over-tighten the packing nut; stop when
you get resistance. The rubber material will fill
the gap very nicely, and the leaking around the
handle should have stopped competely. There is
nothing wrong with the design of the faucet. The
correct order of re-installing these parts is:
(1) the brass packing washer
(2) the new packing gasket material
(3) the packing nut
(4) the handle
The packing nut needs to be tightened around the stem, if that doesn't do it, the packing needs to be replaced.
http://www.rd.com/advice-and-know-how/stepbystep-instructions-and-pictures-of-how-to-stop-a-freezeproof-faucet-from-leaking/article117717.html
Wednesday, February 3, 2010
Fixing window blinds ?Ladder Barrel Drum

http://www.fixmyblinds.com/cgi-bin/ez-catalog/cat_display.cgi?82X339232
http://www.blindsparts.com/servlet/Categories?category=BLINDS%5C%3ADrums%26Cradles&searchpath=2392728&start=91&total=122
TILTERS
http://www.blindsparts.com/servlet/Categories?category=BLINDS%5C%3ADrums%26Cradles&searchpath=2392728&start=91&total=122
Barrels
Cord Locks
Miscellaneous
Mounting Brackets
Restring Kits
Slats and Valance
Tilters
Valance Clips
http://www.fixmyblinds.com/cgi-bin/ez-catalog/cat_display.cgi?82X339232
Replacement Metal Drum for 2" Hunter Douglas Wood Blinds with string ladders.Only Metal Drums Sold. This is a replacement for plastic drum on right.
Old Plastic Metal Drum - Not Available
Price:$3.00
Stock #:DRUM-01
Crimpable Clasps for String Ladders.These are used to attach the tops of the ladders to the drum inside the headrail of the blind.Two needed per cut-ladder section.
Price:$0.25
http://dgwindowshine.en.alibaba.com/search/product?IndexArea=product_en&SearchText=drum
http://www.blindsparts.com/servlet/Categories?category=BLINDS%5C%3ADrums%26Cradles&searchpath=2392728&start=91&total=122
TILTERS
http://www.blindsparts.com/servlet/Categories?category=BLINDS%5C%3ADrums%26Cradles&searchpath=2392728&start=91&total=122
Barrels
Cord Locks
Miscellaneous
Mounting Brackets
Restring Kits
Slats and Valance
Tilters
Valance Clips
http://www.fixmyblinds.com/cgi-bin/ez-catalog/cat_display.cgi?82X339232
Replacement Metal Drum for 2" Hunter Douglas Wood Blinds with string ladders.Only Metal Drums Sold. This is a replacement for plastic drum on right.
Old Plastic Metal Drum - Not Available
Price:$3.00
Stock #:DRUM-01
Crimpable Clasps for String Ladders.These are used to attach the tops of the ladders to the drum inside the headrail of the blind.Two needed per cut-ladder section.
Price:$0.25
http://dgwindowshine.en.alibaba.com/search/product?IndexArea=product_en&SearchText=drum
Friday, January 15, 2010
Concentric vent

You may want to consider using a "concentric vent" that handles both combustion air and exhaust through the same 4" opening in the outside wall. I just installed a 95% Lennox using this vent and it has performed well during the coldest period this winter ( lows to -20F ). The vent is Lennox part #71M80 and is called a 1.5" concentric vent kit. I am familiar with ice buildup on the standard 2" exhaust vents in a cold climate, I used several Lennox Pulse in Fargo, ND in the 1980's but can't say they ever iced up to the point of shutting down the furnace.
The concentric vent ties in to both the 2" combustion air line and the 2" exhaust right before it goes out of the wall through a 4' diameter hole. The exhaust goes out through the middle of this concentric vent and once outside is reduced down to 1 1/2", at a length of 8". The fresh air intake is right near the siding and is the outer portion of this vent, the exhaust keeps this whole unit warm. One other important point is the whole venting system is sloped back to the furnace so no condensation drips from the exhaust vent outside.
Saturday, January 9, 2010
Furnace intake clogged by ice crystals during extremely cold week

 Board placed to discourage floating ice crystals from entering intake pipe.
You can see moisture freezing onto those plant stems. Temp is below 10F

 Warm exhaust makes a bare spot on the ground below.
 Moisture freezing on the bush to the right which is over 10 ft away. sort of like hoar frost.
 Picture with furnace running so you can see the steam.
 In windless condition, the steam goes everywhere. Tends to flow right because the AC blocks the left side.

 Added another shroud over the intake pipe. This might decrease the number of ice crystals entering the intake without restricting the air flow. Plus when there is a blizzard coming from the right side, less snow will enter the intake opening.

 Warm exhaust makes a bare spot on the ground below.
 Moisture freezing on the bush to the right which is over 10 ft away. sort of like hoar frost.
 Picture with furnace running so you can see the steam.
 In windless condition, the steam goes everywhere. Tends to flow right because the AC blocks the left side.
 Added another shroud over the intake pipe. This might decrease the number of ice crystals entering the intake without restricting the air flow. Plus when there is a blizzard coming from the right side, less snow will enter the intake opening.
I might try a length of black perforated drain pipe, maybe 4 ft. That would create a protected zone to suck air from. Unrestricted, but decrease the number of ice crystals and snow entering the intake opening. The black pipe might get heated by sunshine and help evaporate snow and ice that gets into the pipe.
Sunday, January 3, 2010
Delta shower valve parts
http://www.plumbingworld.com/bathvalvesbydelta.html


Delta RP4993 Set of Two Replacement Seats and Springs for Delta Faucets
$3.74 Originally $4.15,
$3.74 Originally $4.15,
Friday, January 1, 2010
Delta shower faucet and tub spout--No hot water
Turn off main water valve first.
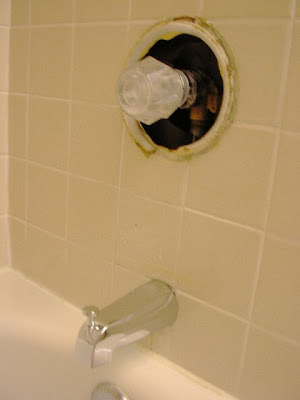
Big chrome ring should unscrew readily counterclockwise. Do not force it, because those teeny copper tubes behind the valve will twist off or pinch.

Copper tubes visible here.
Didn't get a picture, but there was a pea gravel sized chunk of rust in the hot water valve side.
That was enough to choke off hot water flow.
Old tub spout did not want to come off. I started cutting it off. Here is the little 1/2 inch pipe stub the spout attaches to. The threads were totally gunked up with plumbers putty or something.

Old tub spout fragments. Had to hacksaw off the shower diverter stem.

New tub spout installed.
Big chrome ring should unscrew readily counterclockwise. Do not force it, because those teeny copper tubes behind the valve will twist off or pinch.

Copper tubes visible here.

Didn't get a picture, but there was a pea gravel sized chunk of rust in the hot water valve side.
That was enough to choke off hot water flow.
Old tub spout did not want to come off. I started cutting it off. Here is the little 1/2 inch pipe stub the spout attaches to. The threads were totally gunked up with plumbers putty or something.

Old tub spout fragments. Had to hacksaw off the shower diverter stem.

New tub spout installed.

References:
Subscribe to:
Comments (Atom)
